By Hannah Powling
So we’ve covered the Bloody Zombie, the Feline Lioness, so I thought it was time for a Sugar Skull look – and using an easy technique so anyone could recreate this.

In all honesty – I was on a huge time restraint with this look as our lovely intern Rosie had leave early to go to work, so I had a small window of time to get this skull face on her (unfortunately I cant say she turned up with work afterwards with this face on – that would’ve made this a whole lot more entertaining…)
Nevertheless, this was a good challenge to create a look that is achievable, and doesn’t take too long. Time is of the essence. I also wanted to use staple items that would most likely be in your makeup bag already – so no need to buy anything extra or unusual.
What you need

White face paint (this is optional, depending on how gaunt you wish to be!)
Black kohl liner (I used Rimmel Scandaleyes)
A metallic green shadow (or any other colour you wish for that matter, I used MAC Teal pigment),
A black matte eyeshadow (I used MAC Carbon)
A silvery light base eyeshadow (I used Urban Decay Polyester Bride)
Liquid Liner (I used Rimmel Exaggerate Waterproof Liner)
Pink eyeshadow/facepaint (Again, or any other colour you wish, I used MAC Lipmix in Fushia and White, mixed)
How to
1. I started with a pale base all over the skin, you could use either white face paint or a pale foundation.
2. Get some Kohl Liner on your waterline and lash liner on half of the top and bottom, blending out with a pencil brush or any small brush.
3. I started piling on the Teal Eyeshadow on the lid. I think I got a bit excited but then realised I should plan out where I am going to blend this out to! To do this I lightly drew the circular shape around the eyes using the Kohl Pencil and then filled it in with my Teal Shadow.
4. I boldened the circle with the Kohl Pencil and started to blend it into the green a little. Bringing my brush back in I started working some of the Matte Black Eyeshadow into the crease of the eye.
5. I popped on a little of the Pearl Nude Shadow onto the inner corners of the eyes.
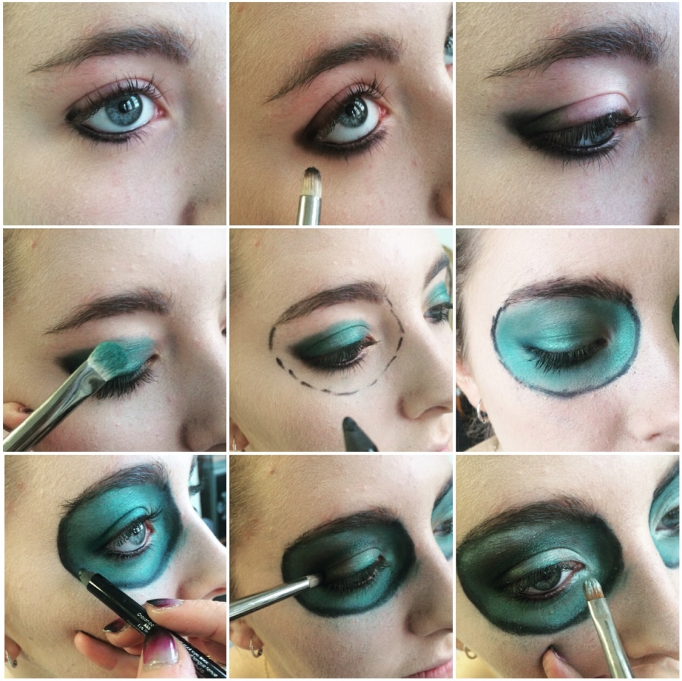
6. After applying Liquid Liner to the top lash line and winging it out, I started to apply my pink dots all around the edges of the ‘eye circles’.
7. Using my Liquid Liner, I followed the dots to make half circles going around the eyes.
8. Give yourself some extremely sunken in cheeks using the Black Matte Eyeshadow with a blending brush, concentrating on under your cheekbones and bringing it to the corner of your mouth.
9. Using an angled or pointed brush, start mapping out your teeth. Simply draw lightly with the Matte Black Eyeshadow a horizontal line from the corners of the mouth and outwards, and with little vertical lines across to imitate the gaps in teeth.
10. Using your Liquid Liner, make the teeth more realistic by gathering and curving off the corners where the lines cross each other, to give shape and contrast to the teeth.
11. Get the nose on, following the shape below using Pencil Liner to map out first and fill in with your Liquid liner.

12. Draw in some patterns on the forehead and chin, using your liquid liner. I have done little swirls and leaf shapes and filled them in with the Teal Eyeshadow to finish.
13. Add heaps of mascara and if you wish, false lashes.. And you’re finished!


–
Want to know how to create the Zombie / Lioness makeup look for Halloween?
–