By Hannah Powling
The second makeup creation at the Beauty and the Dirt headquarters for our Halloween theme is…The Lion. Okay, it’s not particularly scary, we have gone for a bit more of a flirty look with this one. Why not embrace a bronzed and contoured look for the 31st; and get in touch with your feline side..

What you need
Before I get started; here are all the necessary bits that I have used to create this look:

How to
1. I started off this look with applying quite a strong browny-bronze contour using a darker shade of concealer from MAC, Matchmaster in shade 8. It comes as a stick and is a thick cream so easy to just sweep under the cheekbone and blend out and upwards. I have placed a little on the edges of my nose too, concentrating more on the area next to the top of the bridge, under my brows, and blending this out with my fingers.
2. I have used Delilah Concealer Stick in Barley. This is a creamy texture and gorgeous to blend out on the skin and looks pretty flawless, so I have used this to highlight under my eyes, down the centre of my nose, cupids bow and chin.

3. Using a soft blending brush, I have applied Bobbi Brown Eyeshadow in Camel, just in my crease and winging it out, using a piece of tissue (held in place with my other hand) to get a sharp edge, as you can see below.
4. With a slightly pointier brush, I have swept in MAC Eyeshadow in Embark into the outer edge of my crease, and following the sharp edge my tissue has left. I swept a little of this into the inner area of my eyes under my brows (where I previously contoured next to the bridge of my nose).
5. Using the Rimmel Scandaleyes Liner, I have applied this to the centre of my lower lash line, and then blend this out with an angle brush. On the outer corner of the eyes, I haven’t quite joined it up to the eyeshadow on the top lids; leave a gap. For the inner corners, use the angle brush to create the darker line as you can see below.
6. I have used a little of the Bobbi Brown Camel Eyeshadow with a pencil brush just to soften the black liner and blend out a little underneath with.
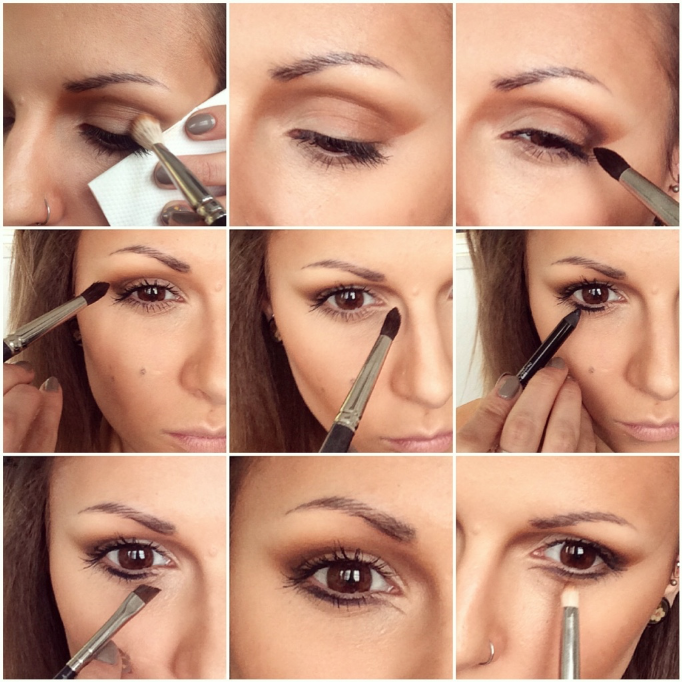
7. To highlight my lids I used MUA Pearl Eyeshadow Champage just with my fingers, and use a pencil brush to apply on the inner corners to be a little more precise with application.
8. To create my white lines I have used MAC Lipmix in White, and I did mix it with a little foundation, but this is optional, it’ll just be a little brighter pure white. Using an angled brush, apply the Lipmix where you had your lovely sharp line from the eyeshadow application… and in the middle of your eyes, following on top of the darker line you created with the Kohl Liner. Clean up by using the same angle brush with the black kohl on to re-draw if needed (which is what I have done below).
9. Using Rimmel Black Waterproof Liquid Liner I have drawn my feline wing as you can see below, making sure I dont go over my white line!

10. Mascara. Lots and lots of mascara especially on the middle of your bottom lashes. For some serious volume I use MAC In Extreme Dimension 3D Black Lash. It is fab.
11. Brows! Do your brows however you like. You can opt for a bit of a darker shade than your usual with this look, to make it a little more defined and strong. I like using my Anastasia Beverly Hills DipBrow in Medium Brown with an angled brush.
12. Apply your nose and whisker dots. Following a feline triangular nose shape I have just painted this on using the Rimmel Black Liquid Liner.

13. At the last minute pop on your black upper lip. The perfect product for this is the LA Splash Cosmetics in Venom, as it dries matte and stays on, without transferring to your bottom lip!
14. Pop on a little MAC Siss Lipstick – it’s a great nude/brown for this look.
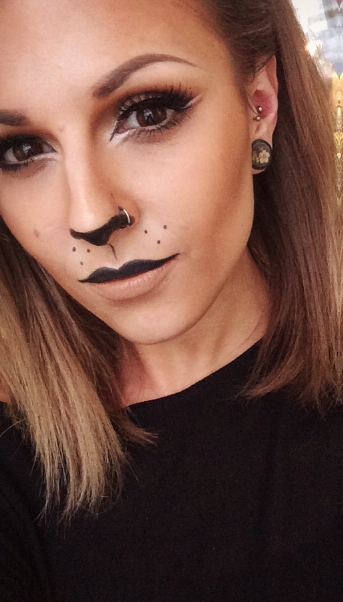
…And you’re finished 🙂
–
Want to know how to create a zombie/vampire eye makeup look or create a Sugar Skull look for Halloween?
–